Part 1 - Set up Drupal 7 REST web server and create a .NET client to perform CRUD operations
I had a very unique situation in my workplace where contents generated in .NET applications such as SharePoint need to be posted in Drupal 7 site. While looking at various options, I have reached the conclusion that I can use existing modules built in Services 3.x (contribute) to allow data transfers from SharePoint to Drupal 7. One option that I have decided to present in this post is called REST server module. After many trials and errors, I can now confidently say that this option is feasible and in fact, very easy to implement. In this post, I will describe step-by-step instructions on how to accomplish this task, and I hope it helps those who need to solve similar problems.
The first challenge I had to overcome during the investigation phase was to understand how Drupal 7 content management system works. Fortunately, the content structure (organization) was very similar to SharePoint which I am more comfortable to work with. Similar to SharePoint, Drupal content management system supports content type, and uses an instance of the content type called "node" to present information. For example, if you have an article content type, each instance of this content type is an actual web page in Drupal. So, in order to populate new content, I have to instantiate new content's content type and make it available (published). By the way, this is a simplified version or my interpretation of how Drupal works and personally, it serves the purpose of this article. For Drupal guru, please bear with me if I have over-simplified Drupal system.
First, I had to configure Services & REST modules. The Drupal provides an easy way to configure contribute modules. By the way, Drupal module installation is not in the scope of this article. Please refer to other sources for detailed instruction. Follow steps below:


Fortunately, Drupal 7 REST server and Services modules take care of all the details on how to create, read, update and delete node, user and file instances. Personally, this was a great relief since I did not want to invest in studying Druapl database abstract layer, field, entity and node api, etc. and creating custom Drupal module to handle remote procedure calls. Now, the question is how to use existing functions properly. The solution was fairly straightforward except file uploading module which requires a special attention or I believe it is a separate subject in its own right. I will dedicate this issue in the second part of this post. For now, just make the following modification to the following configuration files.
In mySQL installation, you can find my.ini configuration file. Look for max_allowed_packet setting and increase it to 50MB. In PHP, you can find php.ini configuration file. Find max_execution_time setting and set to 180 or higher. Also, find memory_limit setting and increase it to 256M (or higher for larger file upload).
I think we are almost ready. Before building the client application, personally, I always like to try the functionality of any new system interfacing modules (in this case, Drupal 7 REST server) without writing codes, if possible. So, I decided to use Fiddler software. I learned this tool while attending one of SoCal CodeCamp and it was awesome and very easy to use. If you don't have this tool installed, go to this site.
Now, we are ready to explore new possibilities. By the way, don't forget to enable Clean URLs (click here for details).
First, I like to try GET operation. This is relatively easy and I can use any browser.


When I saw the newly created node in the list, I was so thrilled and without any doubt, I was confident of this approach. I hope you had a great time reading this post, and I will continue the second part shortly.
The first challenge I had to overcome during the investigation phase was to understand how Drupal 7 content management system works. Fortunately, the content structure (organization) was very similar to SharePoint which I am more comfortable to work with. Similar to SharePoint, Drupal content management system supports content type, and uses an instance of the content type called "node" to present information. For example, if you have an article content type, each instance of this content type is an actual web page in Drupal. So, in order to populate new content, I have to instantiate new content's content type and make it available (published). By the way, this is a simplified version or my interpretation of how Drupal works and personally, it serves the purpose of this article. For Drupal guru, please bear with me if I have over-simplified Drupal system.
First, I had to configure Services & REST modules. The Drupal provides an easy way to configure contribute modules. By the way, Drupal module installation is not in the scope of this article. Please refer to other sources for detailed instruction. Follow steps below:
- Log into the Drupal site with Administrative privilege and click on Modules. Install Services
- Under Services, make sure that Services 7.x-3.x is enabled. This module requires Chaos tools (enabled).

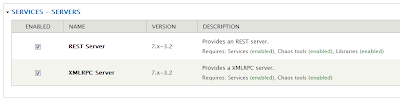
- Under Services - Servers, make user that REST server is enabled. This module requires Services (enabled), Chaos tools (enabled) and Libraries (enabled).

- Go to Services section and click "Configure" operation next to Services module.
- To use REST service, you need to create a new endpoint for your application. Click Add link.


- Add the name of your application's endpoint. In my case, I decided to use rest.
- Under Server drop-down box, select REST.
- Add path to endpoint. In my case, I decided to use rest.
- Under Authentication, check Session authentication and click Save.

- Click Edit Resources to configure the settings of newly created REST server's endpoint.
- At the upper-right side of your screen, you will find tabs where you can make changes. Click on SERVER tab first.
- Under REST Response's formatters, check json. In this example, we are going to use JavaScript Object Notation to make communication between two end-points.
- Under Request parsing, check application/json as well as appliction/x-www-form-urlencoded.
- Now Click RESOURCE tab. You need to select which resources you wish to expose via REST server.
- For the purpose of this demo, we need user, node and file resources. Check these three resources and click Save button located at the bottom of your screen. I think ALIAS are optional, but I decided to assign an arbitrary name to each resource that I am going to use in this article. For simplicity, I will call them user, node and file respectively.

Fortunately, Drupal 7 REST server and Services modules take care of all the details on how to create, read, update and delete node, user and file instances. Personally, this was a great relief since I did not want to invest in studying Druapl database abstract layer, field, entity and node api, etc. and creating custom Drupal module to handle remote procedure calls. Now, the question is how to use existing functions properly. The solution was fairly straightforward except file uploading module which requires a special attention or I believe it is a separate subject in its own right. I will dedicate this issue in the second part of this post. For now, just make the following modification to the following configuration files.
In mySQL installation, you can find my.ini configuration file. Look for max_allowed_packet setting and increase it to 50MB. In PHP, you can find php.ini configuration file. Find max_execution_time setting and set to 180 or higher. Also, find memory_limit setting and increase it to 256M (or higher for larger file upload).
I think we are almost ready. Before building the client application, personally, I always like to try the functionality of any new system interfacing modules (in this case, Drupal 7 REST server) without writing codes, if possible. So, I decided to use Fiddler software. I learned this tool while attending one of SoCal CodeCamp and it was awesome and very easy to use. If you don't have this tool installed, go to this site.
Now, we are ready to explore new possibilities. By the way, don't forget to enable Clean URLs (click here for details).
First, I like to try GET operation. This is relatively easy and I can use any browser.
- Open a browser. Type your Drupal site and append your endpoint. In my case, http://localhost/drupal7 as a site URL and rest as an endpoint. So, the URL becomes http://localhost/drupal7/rest.
- If you want to display the list of nodes (available to the public), type node.xml. So the URL becomes http://localhost/drupal7/rest/node.xml. If you wish to see the list in JSON format, type node.json.
XML format

JSON Format

- As you can see, the GET operation is quite easy. To see the file node, simply type file.xml or file.json.
- Now let's try to post a new node. In this example, I am going to use Fiddler to accomplish this task. In order to post a node, unlike GET, I need to have a permission to add to the node collection. So, first I am going to authenticate using session authentication method. I need a session cookie.
Open Fiddler and click Composer tab. Under Parsed sub-tab, select POST and type your Drupal URL/endpoint/user/login.xml. In my case, the URL becomes http://localhost/rest/user/login.xml.
Under Request Headers, type the following statements:
User-Agent: Fiddler
Content-type: application/x-www-form-urlencoded
Under Request Body, type the user id and password value pairs:
username=youraccountid&password=yourpassword - Click Execute. Once completed, click Inspectors tab, and click XML tab located at the bottom of the screen. You can now see session_name and sessid. If you wish, you can inspect the raw header information (Raw tab) to retrieve the same information. You need this session_name and sessid to post a new node.
- For simplicity, I have decided to create a content type called test. It has 3 fields: title, path and body. You can create a new content type under Structure. For details, refer to Drupal 7 documentation.
- Click Composer tab. Under Parsed sub-tab, select POST and type your Drupal URL/endpoint/node. In my case, the URL becomes http://localhost/rest/node.
- Under Request Headers, type the following statements:
User-Agent: Fiddler
Content-type: application/json
Cookie: session_name=sessid
e.g.)
Cookie: SESSa0bb865e42c8jkl100000eed3d29106c=9McU_zwIl9G4xPlYSGWtTx-6A9a1zDoCqchJH1Ey-WQ - Under Request Body, type the content information in JSON format.
{"title": "Test Content from Jae", "type":"test"} - Click Execute and once completed, go to your browser to verify a newly added node. If you want to display the list of nodes (available to the public), type node.xml. So the URL becomes http://localhost/drupal7/rest/node.xml. If you wish to see the list in JSON format, type node.json.
When I saw the newly created node in the list, I was so thrilled and without any doubt, I was confident of this approach. I hope you had a great time reading this post, and I will continue the second part shortly.
Comments
Post a Comment